
dashan 提交于
Geofield
Geolocation Field
 In this tutorial (for DrupalCamp Ohio 2014)
we'll explore how to build a mobile application and website that can
geo locate places near our current position. The nearby location results
will be displayed on a map, and will allow us to click on a result item
to view its complete details.
The website will be powered by Drupal 7. The mobile application will be built using DrupalGap, which is powered by PhoneGap and jQuery Mobile. Let's get started!
1. Download and Install Drupal 7
- Download
- Install
2. Download and Enable the DrupalGap Module
- Download
- Install
3. Download and Enable the Address Field Module
- Download
- Install
4. Download and Enable the Geofield Module
- Download
- Install
4.a Enable the Geofield Map Module
This module comes packaged with the Geofield module, enable it as well.
5. Download and Enable the Geocoder Module
- Download
- Install
6. Create a Content Type called "Location"
Let's create a content type called "Location" at admin/structure/types/add.
6a. Add an Existing Image Field to the Content Type
- Go to admin/structure/types/manage/location/fields
- In the "Add existing field" section, select "Image: field_image (Image)", or select your own existing image field, or create a new one
- Click the "Save" button
- Keep all the default settings (optional), then click the "Save settings" button
7. Add an Address Field to the Content Type
In Drupal, go to admin/structure/types/manage/location/fields and add a new field with these values:
- Label: Address
- Machine Name: field_address
- Field Type: Postal address
- Widget: Dynamic address form
Click
the "Save" button, then click the "Save field settings" button, and
finally click the "Save settings" button at the bottom of the form.
We'll just use all the default values provided for this tutorial, but
feel free to adjust them.
8. Add a Geofield to the Content Type
In Drupal, go to admin/structure/types/manage/location/fields and add a new field with these values:
- Label: Position
- Machine Name: field_position
- Field Type: Geofield
- Widget: Geocode from another field
Click the "Save" button, then...
- Set the "Geocode from field" select list to "Address"
- Set the "Geocoder" select list to "Google geocoder"
- Click the "Save settings" button at the bottom of the form
We'll just use all the default values provided for this tutorial, but feel free to adjust them.
9. Adjust the "Manage Display" Settings for the Content Type for each Display Mode
- Go to admin/structure/types/manage/location/display
- Change the "Format" for "Position" to "Geofield Map"
- Click the "Save" button.
- Optional, repeat this for other fields and display modes (i.e. DrupalGap display mode)
10 Create some Locations with Addresses and Images
If you haven't already, go ahead and create some location nodes with addresses and images:
node/add/location
The geocoder will automatically fetch the latitude and longitude
coordinates and store them within field_position. I'd recommend creating
location nodes with addresses nearby your current position.
11. Create a Views JSON Page Display to Retrieve Nearby Results
Now
that we've got some location nodes with address and coordinate data,
we're ready to build a View. For this example our center location will
be:
Nationwide and Ohio Farm Bureau 4-H Center
2201 Fred Taylor Dr.
Columbus, OH 43210
Which
has latitude and longitude coordinates of 40.008078, -83.028636. The
View will return to us JSON data about the location nodes that are
within a given coordinates' radius.
11.1 Create the View
- In Drupal, go to: admin/structure/views/add, then input these values:
- View name: Nearby Locations
- Machine name: nearby_locations
- Show Content of type Location sorted by Unsorted
- Check the "Create a page" box
- Path: nearby-locations.json
- Display format: JSON data document
- Items to display: 5
- Click "Continue & Edit"
11.2 Create a Contextual Filter for the Geofield's Proximity
- In the "Contextual Filters" section, Click the "Add" button
- Type the word "Position" into the Search box, to locate your field
- In the search results, check the box next to "Content: Position (field_position) - proximity"
- Click the "Apply (All Displays)" button
- In the "When the Filter Value is not in the URL" section, select the 'Display contents of "No Results Found"' radio button
- Expand the "Exceptions" field set, and clear out the "Exception value" text field
- Scroll down to the "Unit of Distance" selection list and choose your preferred option (we'll use Miles for this example)
- Click the "Apply (All Displays)" button
Why miles? Well you see, here in America we don't like units of 10, and instead prefer to make our lives, and the rest of the world's, difficult.
11.3 Sort by Closest Location (Proximity)
- In the "Sort criteria" section, Click the "Add" button
- Type the word "Position" into the Search box, to locate your field
- In the search results, check the box next to "Content: Position (field_position) - proximity"
- Click the "Apply (All Displays)" button
- Select the "Sort ascending" radio button
- Under the "Source of Origin Point" select list, choose the "Contextual Geofield Proximity Filter" option
- Click the "Apply (All Displays)" button
11.4 Change the Label on the Title Field, and Add 3 Fields: nid, proximity/latitude and proximity/longitude
We'll adjust the label on the title field, and add 2 more fields to our View:
- In the "Fields" section, click on the "Title" field, and change the label to: title
- Click the "Apply (All Displays)" button
- Click the "Add" button to add a new field
- Type the word "Nid" into the Search box, to locate the "Content: Nid" checkbox
- Click the "Apply (All Displays)" button
- Change the label to: nid
- Click the "Apply (All Displays)" button
- Click the "Add" button to add another field
- Type the word "Position" into the Search box, to locate your field
- In the search results, check the box next to "Content: Position (field_position) - proximity"
- Click the "Apply (All Displays)" button
- Uncheck the "Create a label" checkbox
- Set the "Round" to 2 decimal points
- Select the "Miles" option on the "Unit of Measure" select list
- Under the "Source of Origin Point" select list, choose the "Contextual Geofield Proximity Filter" option
- Click the "Apply (All Displays)" button
11.4a Add a Latitude and Longitude Field to the View
- In the "Fields" section, click the "Add" button
- Type the word "Position" into the Search box, to locate your field
- In the search results, check the box next to "Content: Position"
- Click the "Apply (All Displays)" button
- Change the label to: latitude
- Change the "Formatter" to "Latitude Only"
- Click the "Apply (All Displays)" button
- Repeat steps 1-7 for Longitude
11.4 b Add an Image Field to the View
- In the "Fields" section, click the "Add" button
- Type the word "Image" into the Search box, to locate your field
- In the search results, check the box next to "Content: Image"
- Click the "Apply (All Displays)" button
- Uncheck the "Create a label" checkbox
- Change the "Image style" to "Thumbnail 100x100"
- Click the "Apply (All Displays)" button
11.5 Preview the Results
- Scroll down to the "Preview with contextual filters" text field
- Enter
your latitude and longitude separated by comma (with no spaces), then
add an underscore followed by the radius to search within. For example, 40.008078,-83.028636_4 - Click the "Update preview" button
- Observe the results
What
this means is, given a latitude and longitude center point, find
content within a 4 mile radius. Adjust the coordinates and radius to
simulate a position near you and your content. Here's what the result
set will look similar to:
{
"nodes" : [
{
"node" : {
"title" : "Ohio Stadium Football Field",
"field_geofield_distance" : "0.6",
"nid" : "1",
"latitude" : "40.003680400000",
"latitude" : "-83.019381800000",
"field_image" : {
"src": "http://example.com/sites/default/files/...",
"alt": ""
}
},
{
"node" : {
"title" : "The Ohio Statehouse",
"field_geofield_distance" : "3.6",
"nid" : "5",
"latitude" : "39.961333000000",
"latitude" : "-82.998887300000",
"field_image" : {
"src": "http://example.com/sites/default/files/...",
"alt": ""
}
}
},
{
"node" : {
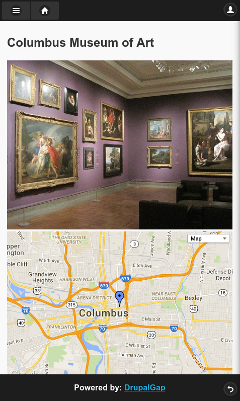
"title" : "Columbus Museum of Art",
"field_geofield_distance" : "3.7",
"nid" : "3",
"latitude" : "39.964359000000",
"latitude" : "-82.987958000000",
"field_image" : {
"src": "http://example.com/sites/default/files/...",
"alt": ""
}
}
}
]
}12. Download and Install the DrupalGap Mobile Application Development Kit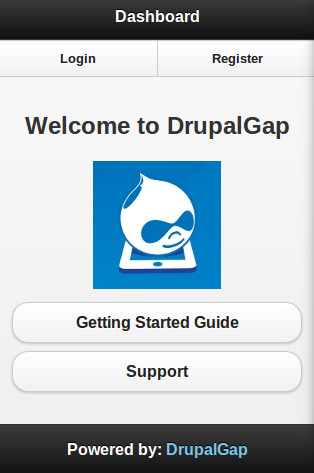
- Download
- Install
During the installation process, it is recommended to use a mobile device with Option 2 when setting up the PhoneGap environment. If this is your first time building a DrupalGap app, it is recommended to go with Option 1 instead.
Option
2, will allow us to compile the app directly to our mobile device.
Chances are our mobile device has a GPS feature, so we can use it to
locate nearby locations.
Once installed, DrupalGap will look something like the screen shot to the right, when it is running on the mobile device.
13. Enable the Address Field and Geofield Modules in the App
Download the modules and extract them into the app/modules directory:
- Download Address Field
- Download Geofield
Then enable them inside the settings.js file:
Drupal.modules.contrib['addressfield'] = {};
Drupal.modules.contrib['geofield'] = {};
14. Create a Page in the App to Display a Map
Next, let's follow the DrupalGap Google Map example documentation, which will create a simple page in the app that displays a map.
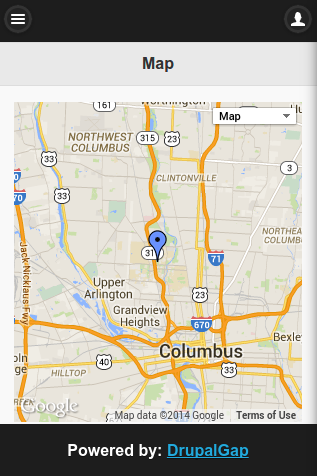
15. Set the App's Front Page to the Map
In our app's settings.js file, we'll set the front page of our app to the map:
drupalgap.settings.front = 'map';
Once loaded, the app will try to lookup our current position and display it on a map:
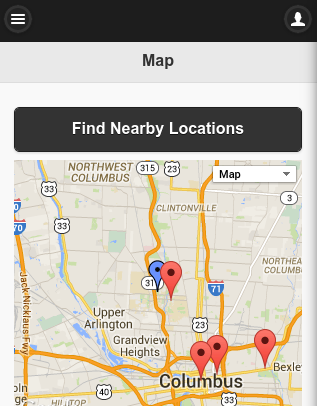
16. Add a Button and an Empty List, to Find and Display Nearby Locations
In my_module_map() (the page_callback function for the map), let's add a button above the map:

content['find_nearby_locations'] = {
  theme: 'button',
  text: 'Find Nearby Locations',
  attributes: {
    onclick: "_my_module_map_button_click()",
    'data-theme': 'b'
  }
};
and an empty list below the map:
content['location_results'] = {
  theme: 'jqm_item_list',
  items: [],
  attributes: {
    id: 'location_results_list'
  }
};
When the button is clicked, it will call the Drupal website (the
Views JSON Page) and pass along our current position to it (as a
contextual filter):
/**
 * The "Find Nearby Locations" click handler.
 */
function _my_module_map_button_click() {
  try {
    // Build the path to the view to retrieve the results.
    var range = 4; // Search within a 4 mile radius, for illustration purposes.
    var path = 'nearby-locations.json/' +
      _my_module_user_latitude + ',' + _my_module_user_longitude + '_' + range;

    // Call the server.
    views_datasource_get_view_result(path, {
        success: function(data) {

          if (data.nodes.length == 0) {
            drupalgap_alert('Sorry, we did not find any nearby locations!');
            return;
          }

          // Iterate over each spot, add it to the list and place a marker on the map.
          var items = [];
          $.each(data.nodes, function(index, object) {

              // Render a nearby location, and add it to the item list.
              var row = object.node;
              var image_html = theme('image', { path: row.field_image.src });
              var distance =
                row.field_geofield_distance + ' ' +
                drupalgap_format_plural(row.field_geofield_distance, 'mile', 'miles');
              var description =
                '<h2>' + distance + '</h2>' +
                '<p>' + row.title + '</p>';
              var link = l(image_html + description, 'node/' + row.nid);
              items.push(link);

              // Add a marker on the map for the location.
              var locationLatlng = new google.maps.LatLng(row.latitude, row.longitude);
              var marker = new google.maps.Marker({
                  position: locationLatlng,
                  map: _my_module_map,
                  data: row
              });

          });
          drupalgap_item_list_populate("#location_results_list", items);

        }
    });
  }
  catch (error) { console.log('_my_module_map_button_click - ' + error); }
}
The server will respond with some JSON data about the nearby
locations, and we'll display them on the map and inject them into the
empty list:
And if we scroll down we can see the result list:
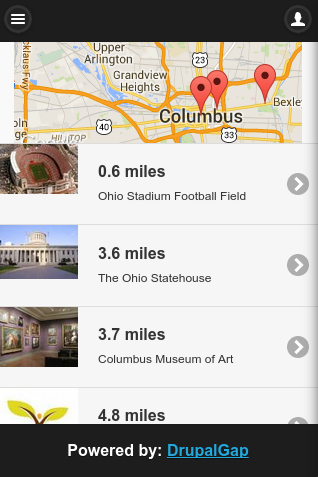
17. Click on a Result List Item to View a Location Node
Provided we adjusted the DrupalGap Display Mode for our content type, we can now click on a list item result to view the actual node automatically!
This is because DrupalGap has built in support for many common Drupal paths, such as:
node/123
node/123/edit
user/456
user/456/edit
user/login
user/register
etc...
18. Conclusion
 Thank you to DrupalCamp Ohio for the opportunity to present this tutorial!
I hope you enjoyed the tutorial. This would not be possible without Drupal, PhoneGap, jQuery Mobile and the countless other open source projects involved. Cheers to open source software!
- 登录以发表评论